
ROBOLOP BERYLLIUM BMW 323ci


 Oct 31, 2011 | 02:50 PM
#22

Thread Starter
| Teamspeed Member
Joined: Jan 2008
Posts: 179


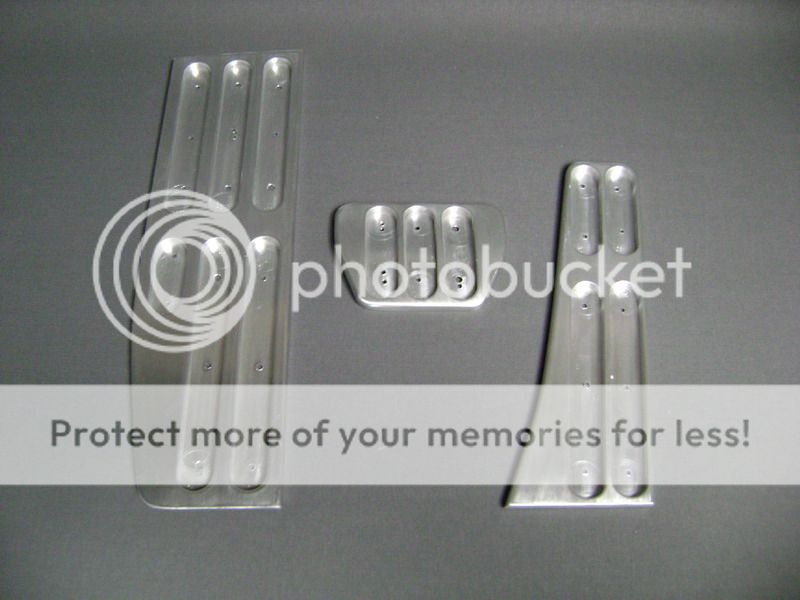
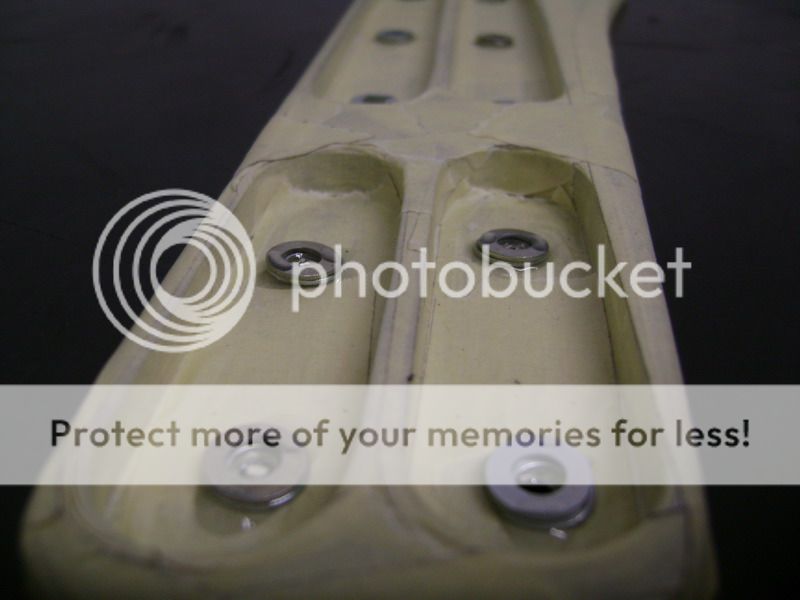
I’ve decided to make me my own set of aluminum pedals, cause I’ve looked everywhere for some descent ones, but didn’t find it.
First of all, I made some models in MDF wood.
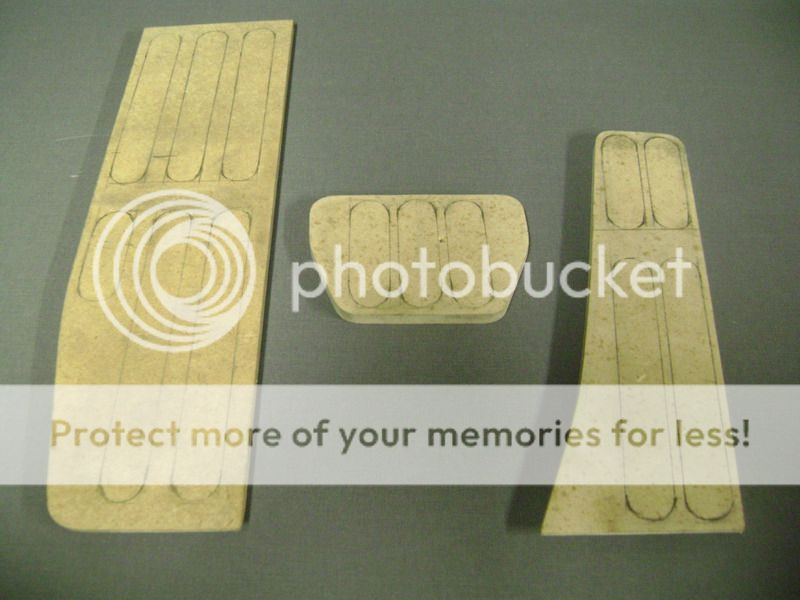
Once I had this, I copied this in 8mm thick aluminum.
Then I milled in some sloths of 20mm and 6mm deep.
This is the foot-rest on the left side.
Since there’s a rounding in the plastic where this comes against to, I had to make this on the backside of the aluminum too.
So it connects lovely on the side.
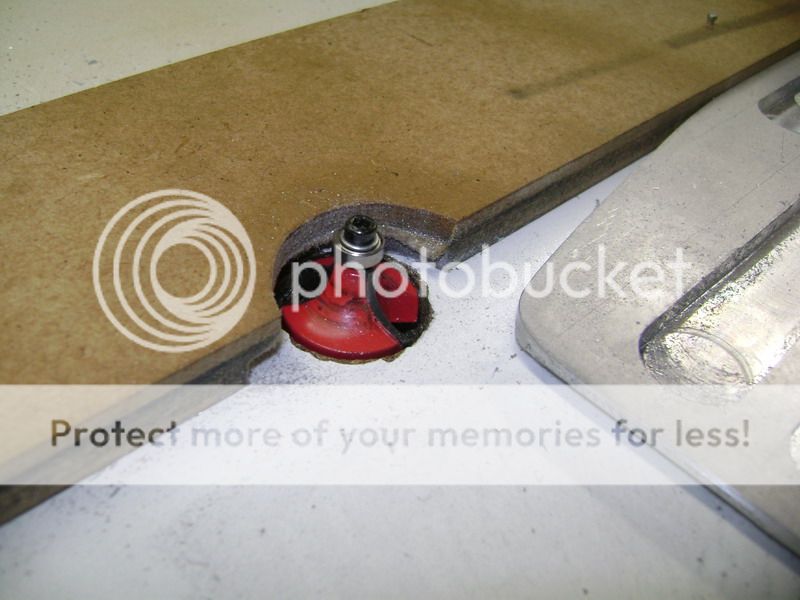
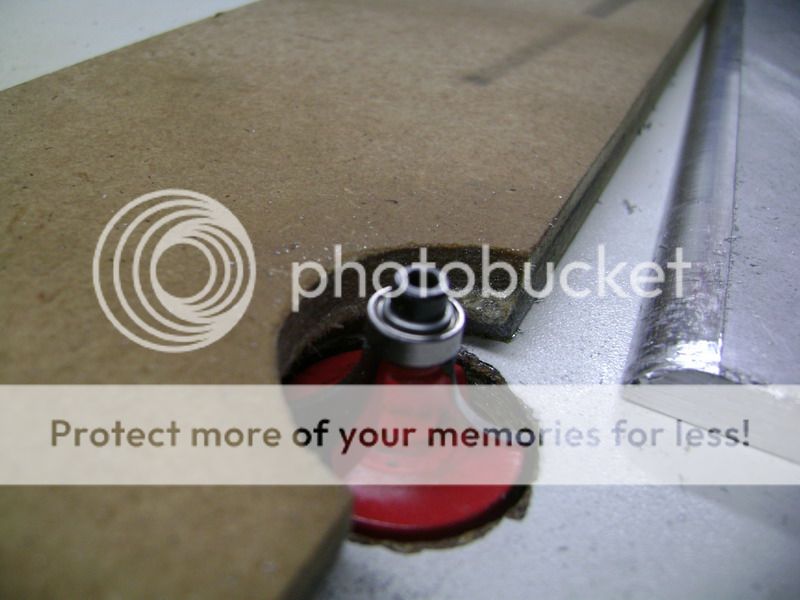
This will be the brake-pedal
Gas
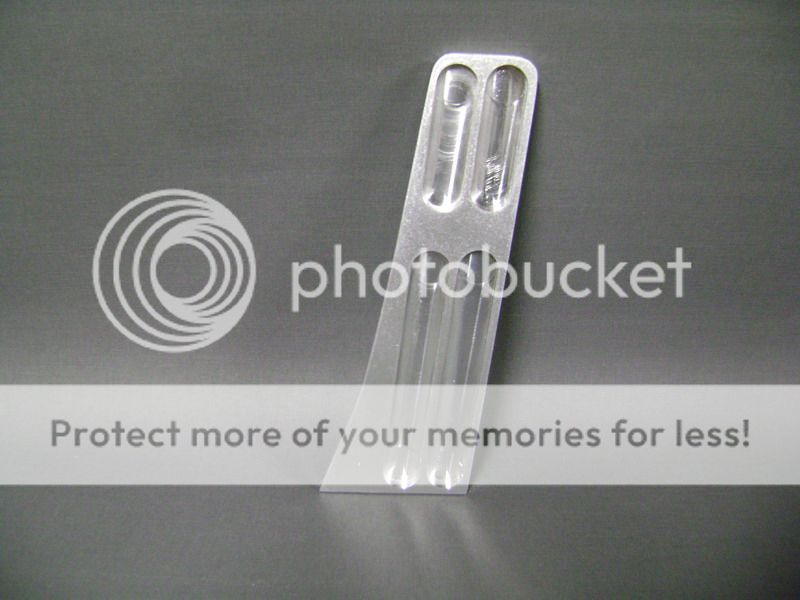
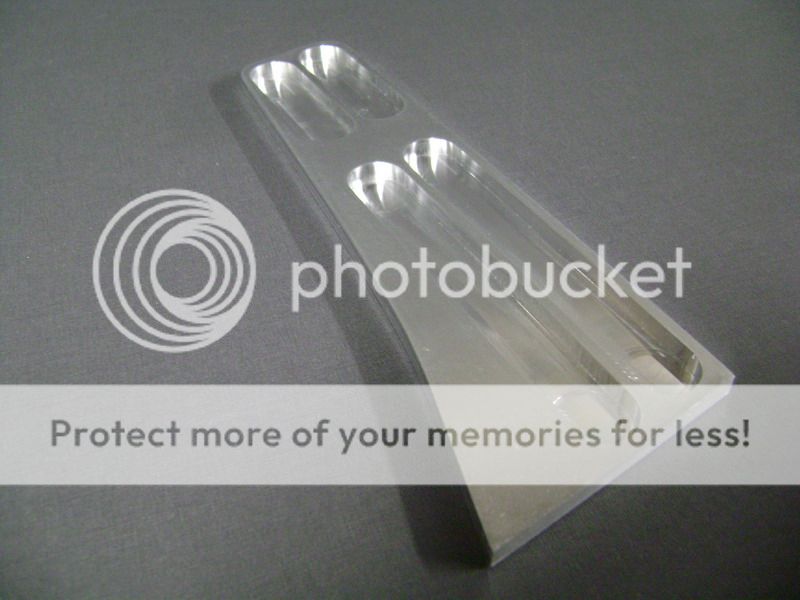
Brake
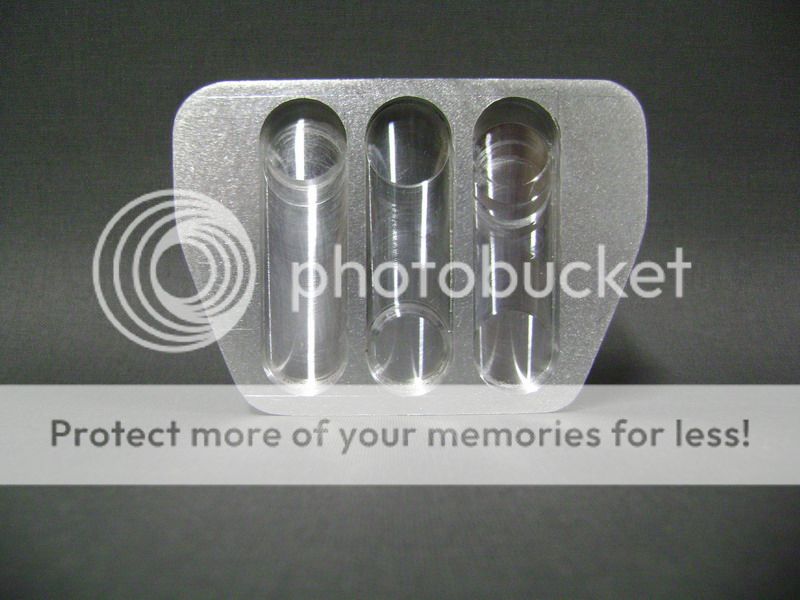
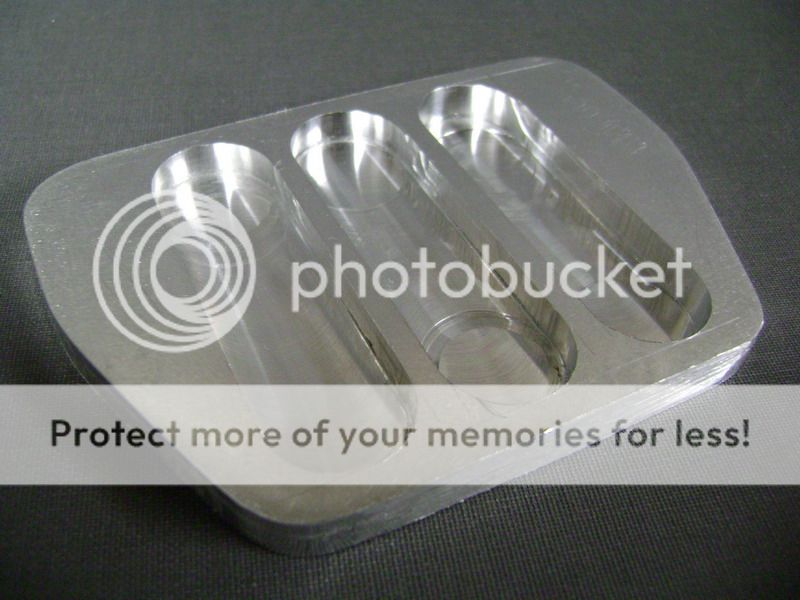
Foot-rest
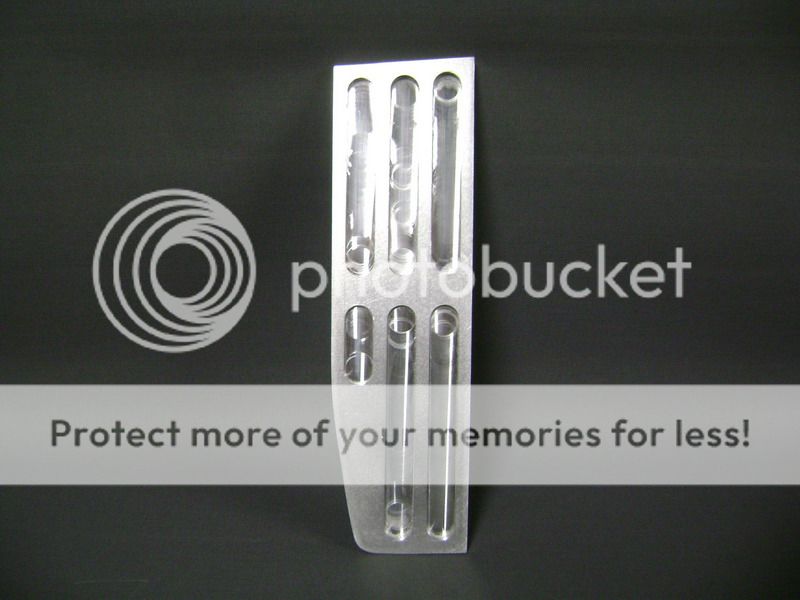
What you see here, are many hours of work. And it’ still not finished. I still have to do my magic trick still

First of all, I made some models in MDF wood.
Once I had this, I copied this in 8mm thick aluminum.
Then I milled in some sloths of 20mm and 6mm deep.
This is the foot-rest on the left side.
Since there’s a rounding in the plastic where this comes against to, I had to make this on the backside of the aluminum too.
So it connects lovely on the side.
This will be the brake-pedal
Gas
Brake
Foot-rest
What you see here, are many hours of work. And it’ still not finished. I still have to do my magic trick still
Oct 31, 2011 | 02:51 PM
#23
Thread Starter
| Teamspeed Member
Joined: Jan 2008
Posts: 179
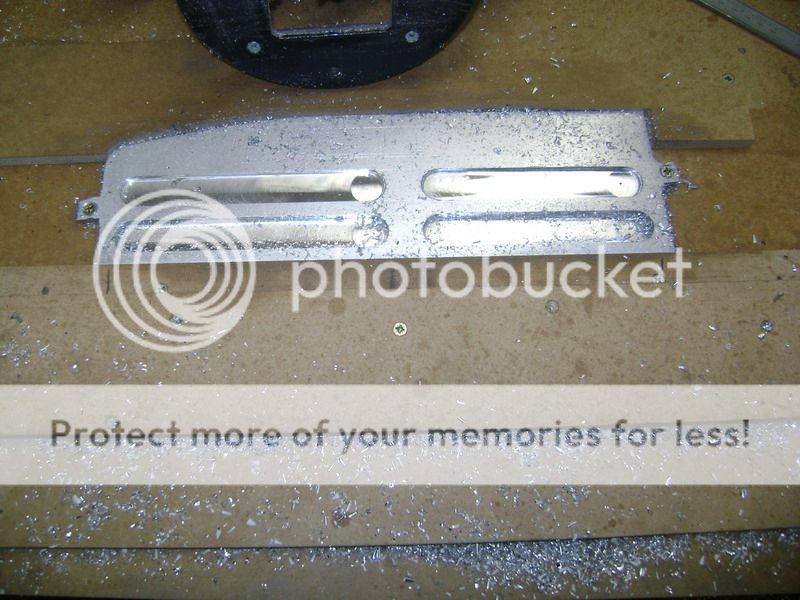
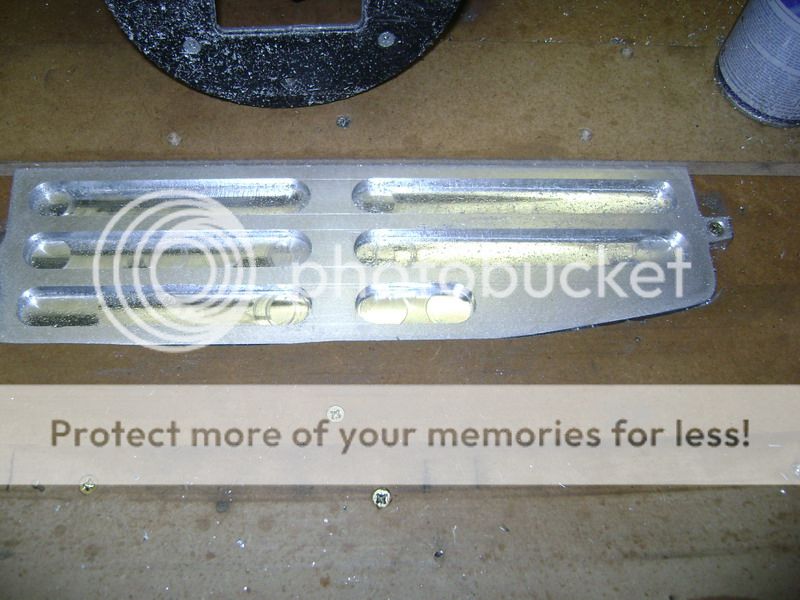
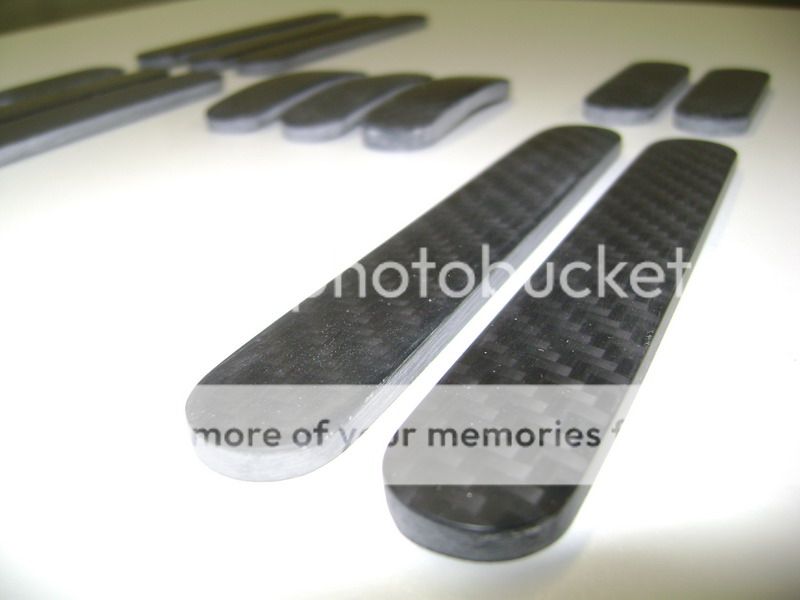
I bended my brake pedal a little bit rounder. I think that must have been the biggest problem I could have, concerning the pedals that is.
I've managed to do this simple. On the front end I taped, on the top and the bottom, a little block of wood, with a little little plank on.
On the backside I taped a little block in the middle, and after that, put it all between the benchscrew.
Then I put a piece of barrel over the lever, so the lever gets bigger. Once I had this, it was simple to turn, and so bend the aluminum piece of 8mm.
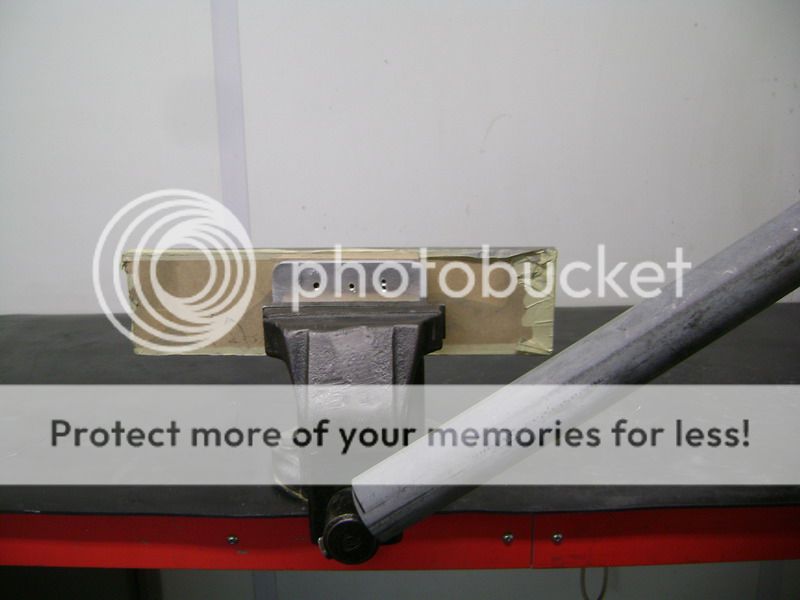
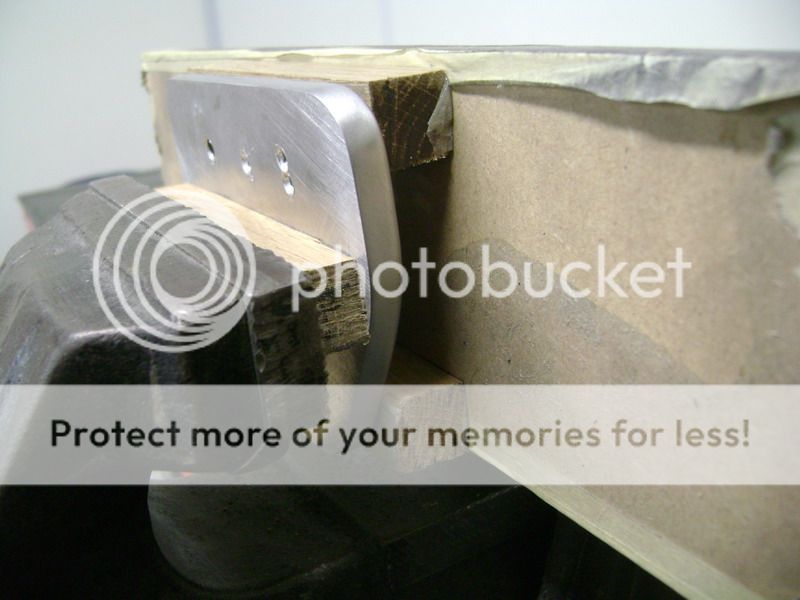
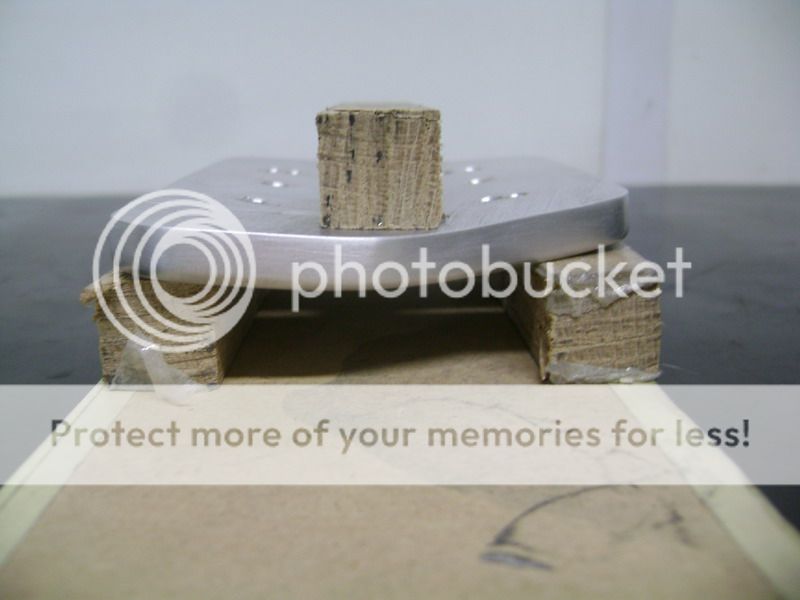
The rounding now is the same as the original pedal by bmw
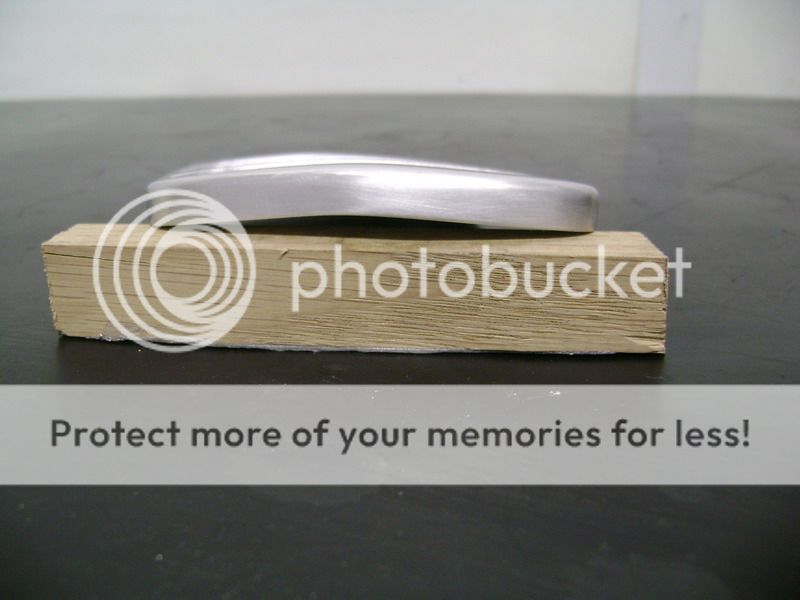
It took some time to grind it all firmly, and I stopped with a 1200 wet.
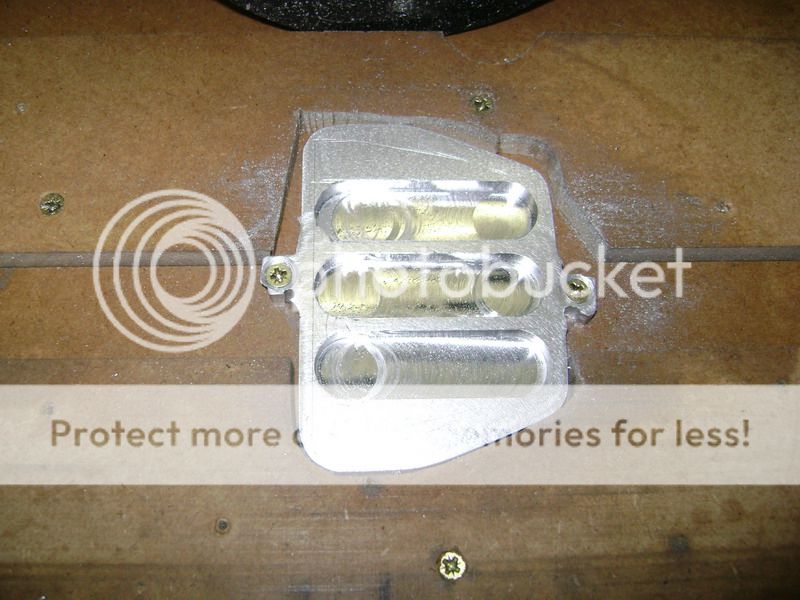
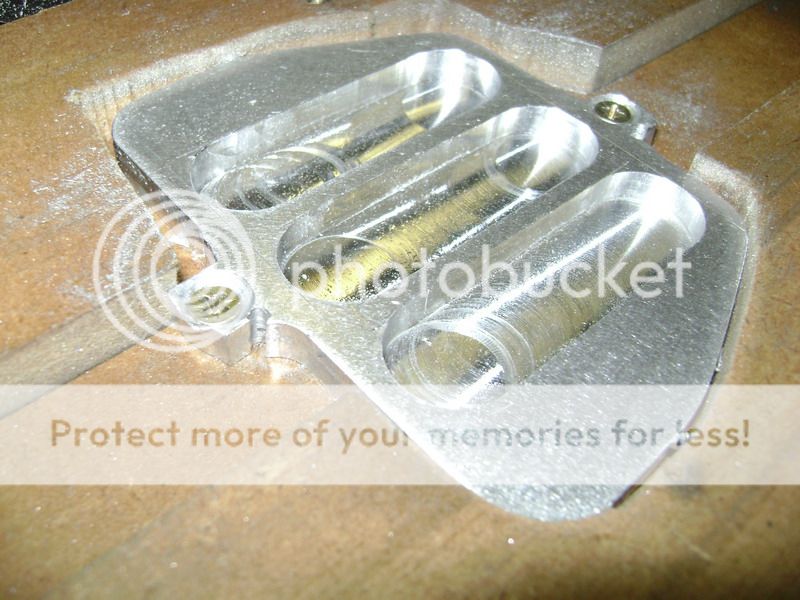
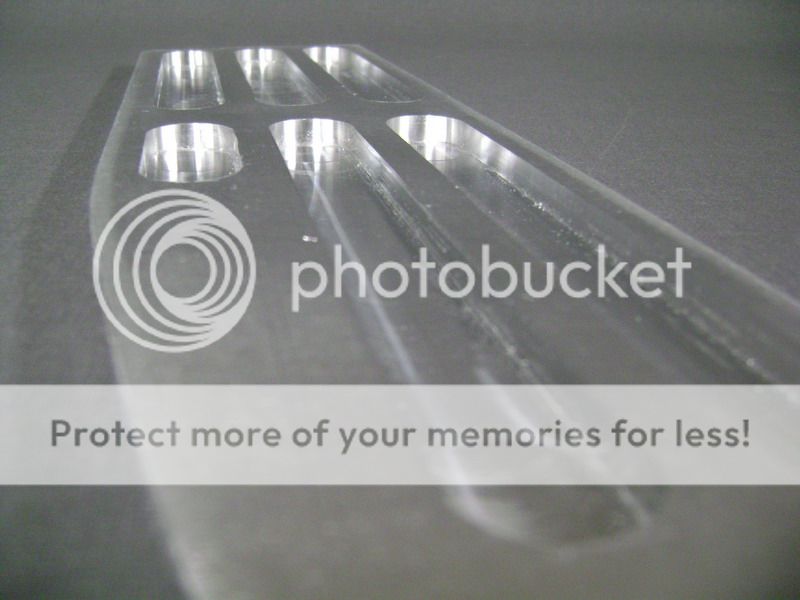
Now it was the time to make some inlay-pieces. First I taped the sloths with tape.
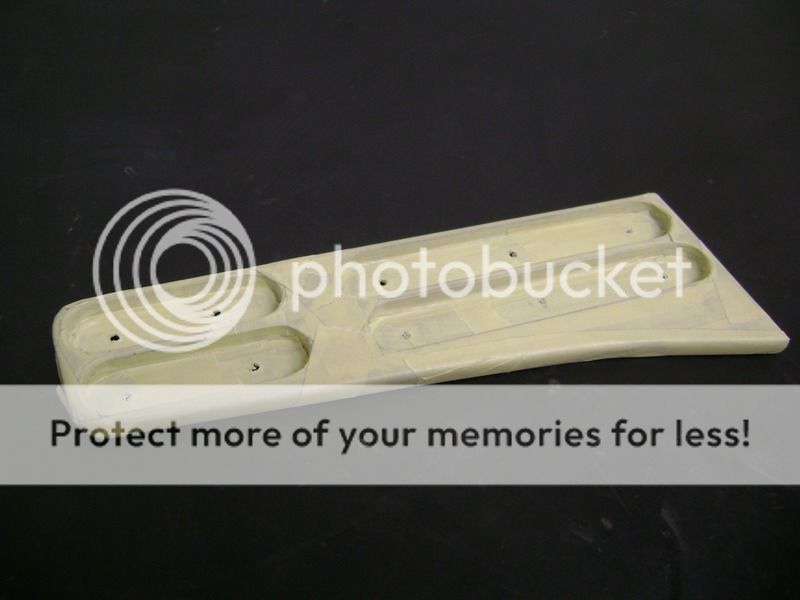
The I taped 2 roundels on each other, and placed in on the whole where screws come out.
I the meanwhile I made some iron little plates of 3mm thick. I had to do this, so I could taped some screws in there, to tighten it all.
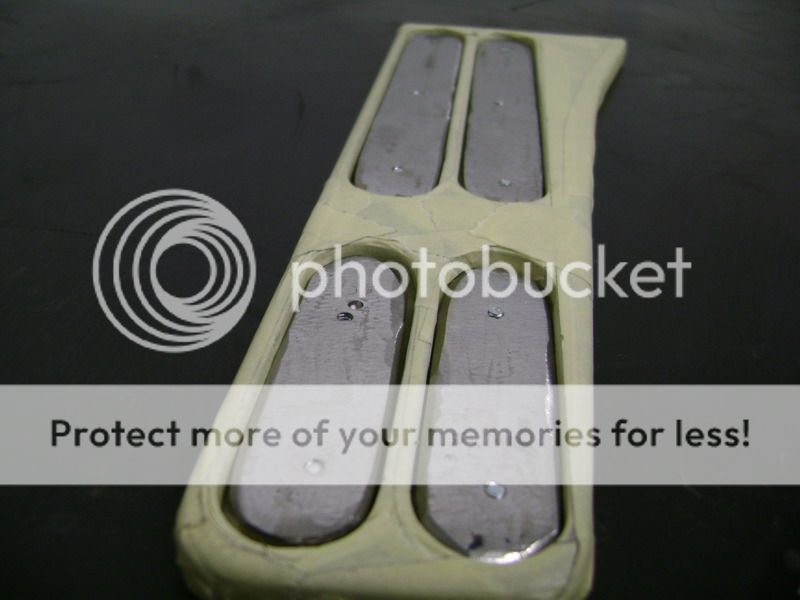
Then I filled it all up with epoxy.
When it's all dry, I'll take out the plates, and they will have the same model als the sloths. buuuuuuuuuuuuuuuuuuut, they will be 2mm deeper then the alu.
The 2mm I need for the carbon and epoxy who will get on there.
I've managed to do this simple. On the front end I taped, on the top and the bottom, a little block of wood, with a little little plank on.
On the backside I taped a little block in the middle, and after that, put it all between the benchscrew.
Then I put a piece of barrel over the lever, so the lever gets bigger. Once I had this, it was simple to turn, and so bend the aluminum piece of 8mm.
The rounding now is the same as the original pedal by bmw
It took some time to grind it all firmly, and I stopped with a 1200 wet.
Now it was the time to make some inlay-pieces. First I taped the sloths with tape.
The I taped 2 roundels on each other, and placed in on the whole where screws come out.
I the meanwhile I made some iron little plates of 3mm thick. I had to do this, so I could taped some screws in there, to tighten it all.
Then I filled it all up with epoxy.
When it's all dry, I'll take out the plates, and they will have the same model als the sloths. buuuuuuuuuuuuuuuuuuut, they will be 2mm deeper then the alu.
The 2mm I need for the carbon and epoxy who will get on there.
Oct 31, 2011 | 02:52 PM
#24
Thread Starter
| Teamspeed Member
Joined: Jan 2008
Posts: 179
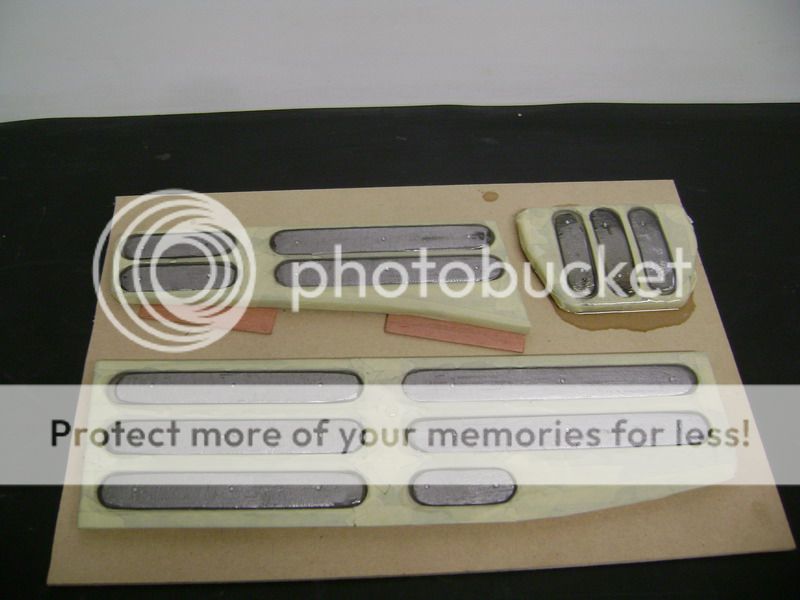
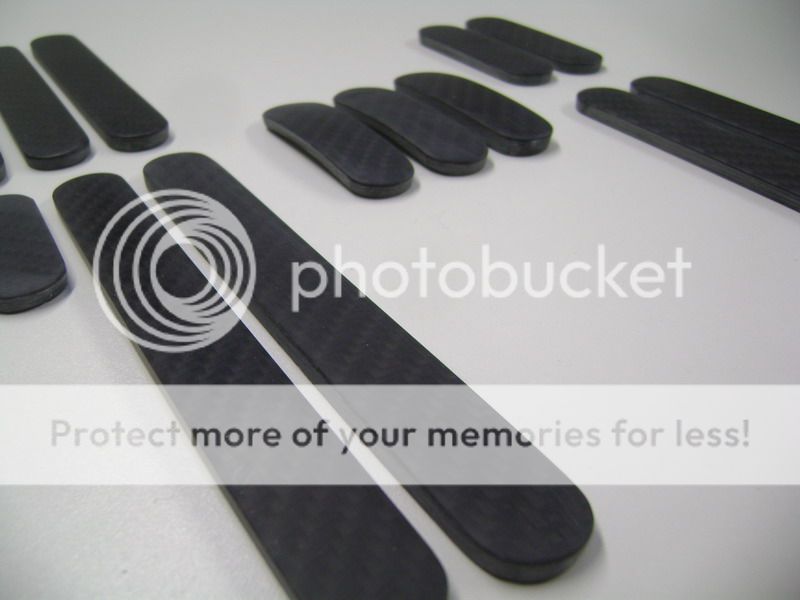
I’ve baked some carbon cakes in my oven.
Offcourse, these need another set of epoxi-layers. The alu pedals go somewhere to get anodized, so they look exactly the same as the indoor moldings. Once I get them back, it’ll take some time to nicely cut out the little carbon pieces, and abrade them so they fit 100%.
I also did some tests with carbon fibre.
Here you see one.
I had an original BMW logo laying here somewhere, so I covered it with carbon� Real stuff dude, no sticky sticker shit.
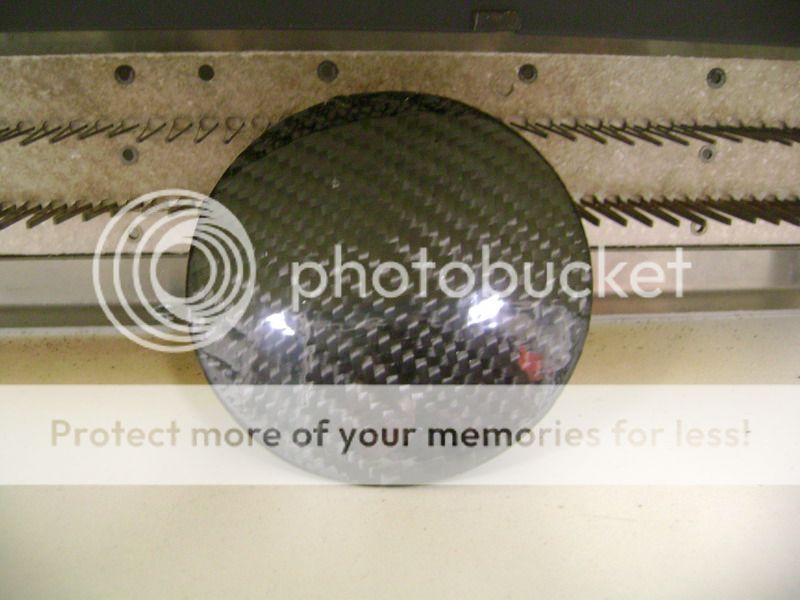
To do this right I had to use a Copperfield trick�and it worked out nicely. On the plate you see, there’s only 1 layer of epoxy. And I rubb this over, one more layer will be added and it’s finished.
So not as many work then when you need to put 4-5 layers.
You can also see I got the side really smooth and fine.
And who was it that said is was very hard to use carbon fibre on corners?
Offcourse, these need another set of epoxi-layers. The alu pedals go somewhere to get anodized, so they look exactly the same as the indoor moldings. Once I get them back, it’ll take some time to nicely cut out the little carbon pieces, and abrade them so they fit 100%.
I also did some tests with carbon fibre.
Here you see one.
I had an original BMW logo laying here somewhere, so I covered it with carbon� Real stuff dude, no sticky sticker shit.
To do this right I had to use a Copperfield trick�and it worked out nicely. On the plate you see, there’s only 1 layer of epoxy. And I rubb this over, one more layer will be added and it’s finished.
So not as many work then when you need to put 4-5 layers.
You can also see I got the side really smooth and fine.
And who was it that said is was very hard to use carbon fibre on corners?
Oct 31, 2011 | 02:53 PM
#25
Thread Starter
| Teamspeed Member
Joined: Jan 2008
Posts: 179
The things I ordered to finish off the amp-box, are currently hanging somewhere over the ocean.
I'd better ordered them a size bigger, cause it's about 30 degrees(Celcius) difference from there to here, and those things could shrimp from the cold.
But still, it's positive news they're on the way.
Dropped of the aluminium pedals too, and will get them back in two weeks normally. On the carbon lay-ins of the pedals I did some layers epoxy already, and there will be a lot of rabrading to get this tight, but we can do it.
I also kept myself warm by milling some things for around the carbon BMW emblems.
I first thought of making these completely out of carbon fibre, but that looked like sh* ...
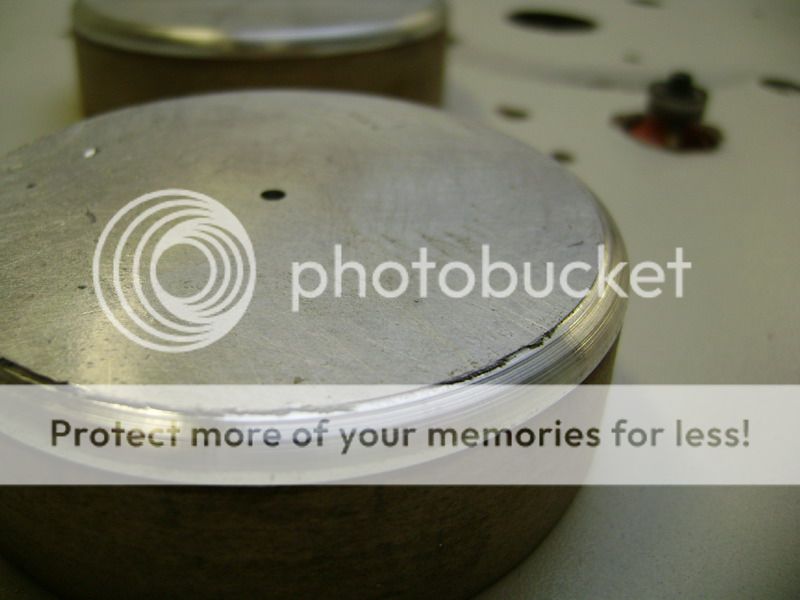
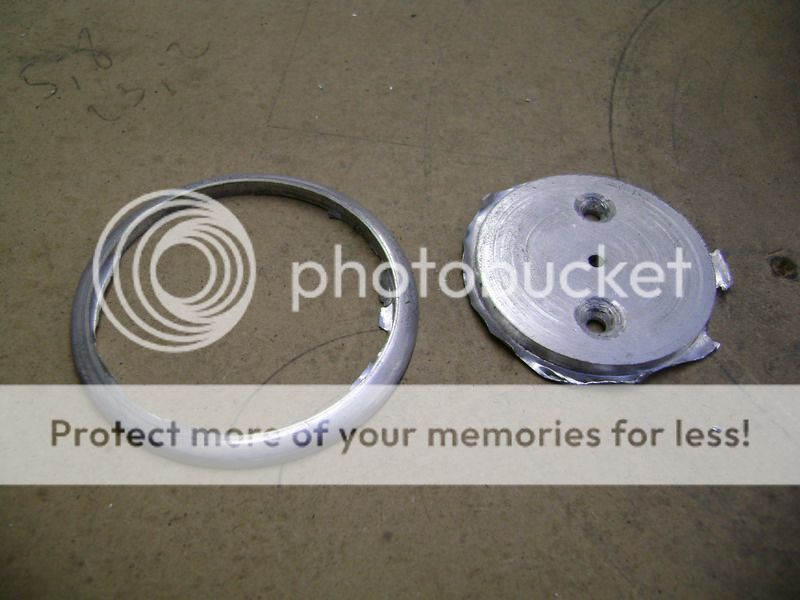
So I started by making 2 aluminium rings who will come around the emblems.
First I made 2 MDF blocks's, and glued a piece of 4mm aluminium against it.
Then held it to the copy-mill, with this as result.
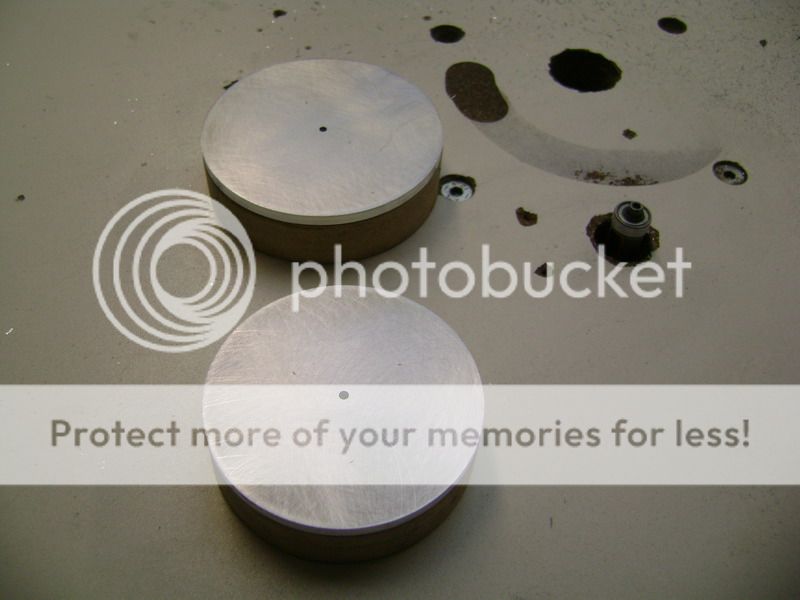
Then I put in another mill, and made a nice rounding on the upper side.
Then it was time for the professional work, and went about 4mm deeper with the right mill.
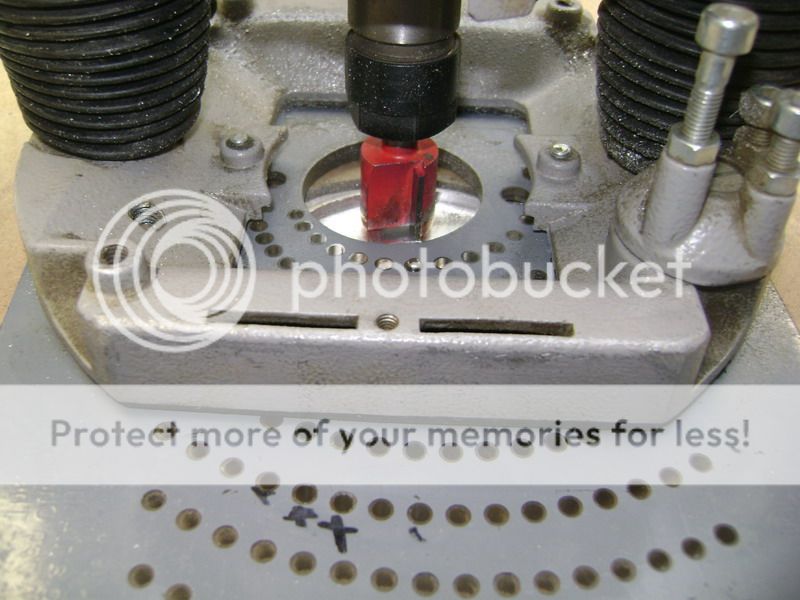
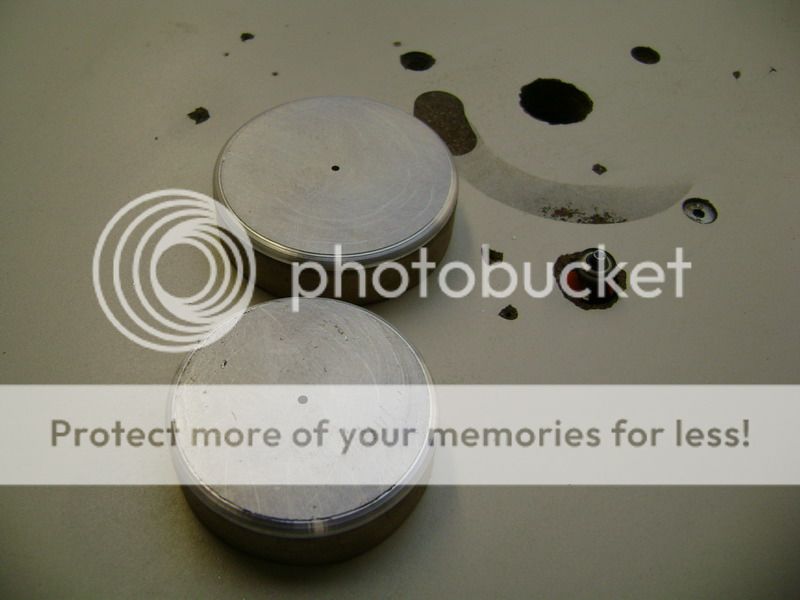
The grey disc with all the holes, I bought when I was in L.A.
Here your mill onto, and knock on the attached pin, in the center of your piece. So you can chose with diamter you delete. It's something really really simlple, but just so practical, and I wasn't able to find it here in Belgium.
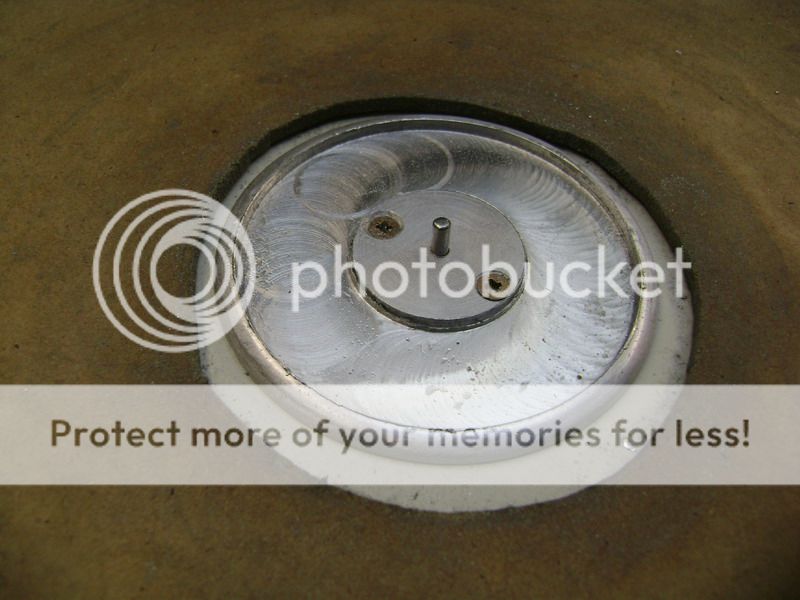
Here you see the little ring I need on the left side.
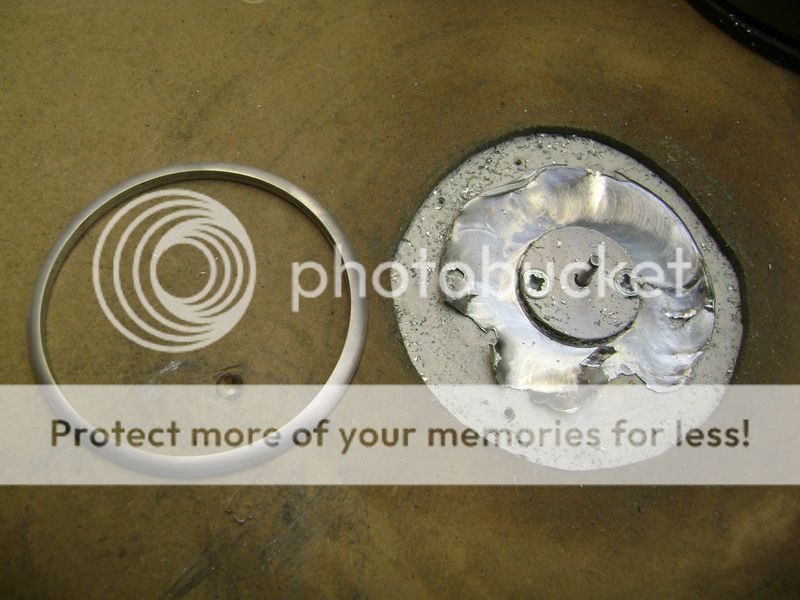
You can say....it looks much better then without the ring.
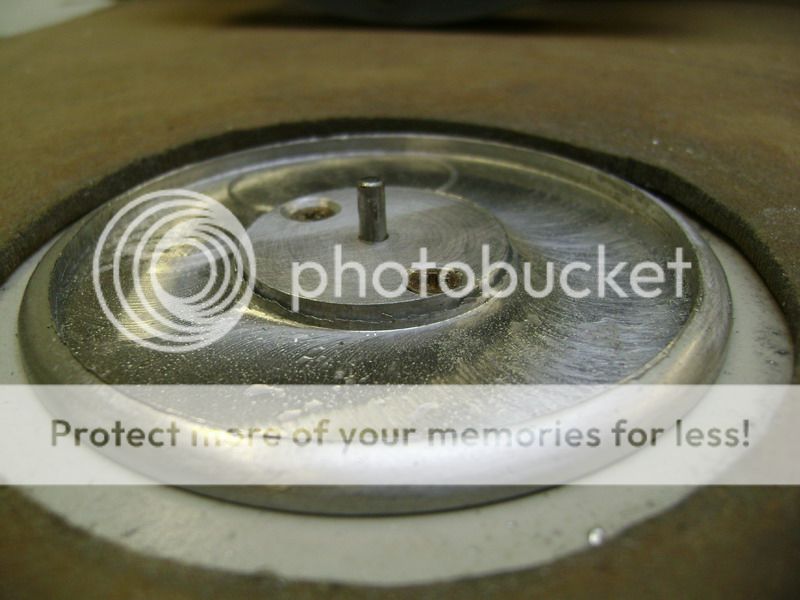
I did the same for the logo on the backside, just that's a bit smaller.
Here they are, Dumb & Dumber
On the backside, I milled it all a bit diagonal, cause I'm going to glue the carbon into the aluminum with 2 components glue

I'd better ordered them a size bigger, cause it's about 30 degrees(Celcius) difference from there to here, and those things could shrimp from the cold.
But still, it's positive news they're on the way.
Dropped of the aluminium pedals too, and will get them back in two weeks normally. On the carbon lay-ins of the pedals I did some layers epoxy already, and there will be a lot of rabrading to get this tight, but we can do it.
I also kept myself warm by milling some things for around the carbon BMW emblems.
I first thought of making these completely out of carbon fibre, but that looked like sh* ...
So I started by making 2 aluminium rings who will come around the emblems.
First I made 2 MDF blocks's, and glued a piece of 4mm aluminium against it.
Then held it to the copy-mill, with this as result.
Then I put in another mill, and made a nice rounding on the upper side.
Then it was time for the professional work, and went about 4mm deeper with the right mill.
The grey disc with all the holes, I bought when I was in L.A.
Here your mill onto, and knock on the attached pin, in the center of your piece. So you can chose with diamter you delete. It's something really really simlple, but just so practical, and I wasn't able to find it here in Belgium.
Here you see the little ring I need on the left side.
You can say....it looks much better then without the ring.
I did the same for the logo on the backside, just that's a bit smaller.
Here they are, Dumb & Dumber
On the backside, I milled it all a bit diagonal, cause I'm going to glue the carbon into the aluminum with 2 components glue
Oct 31, 2011 | 02:54 PM
#26
Thread Starter
| Teamspeed Member
Joined: Jan 2008
Posts: 179
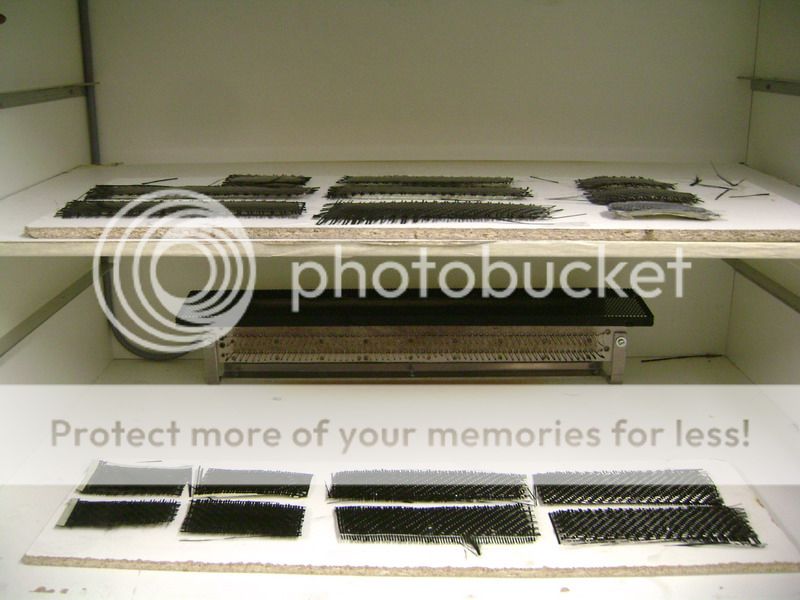
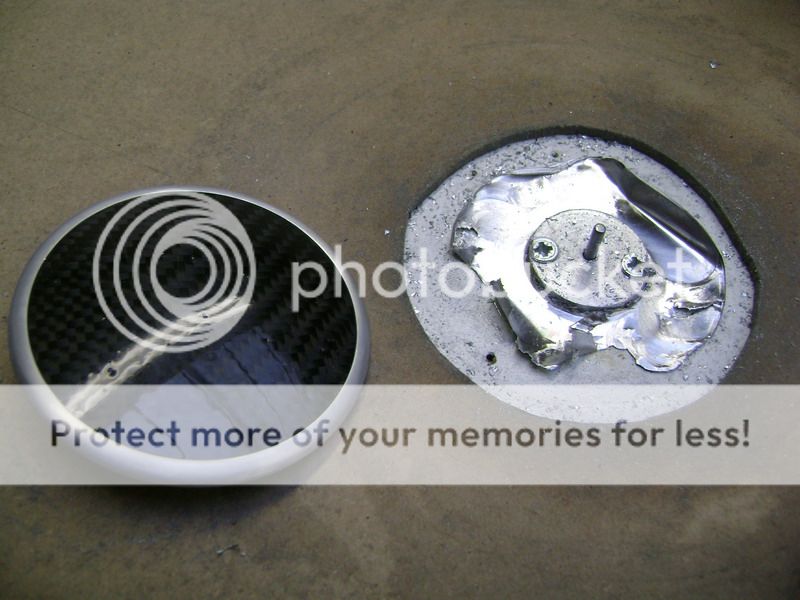
The carbon lay-ins are ready to get some layers of varnish. To become this result, I’ve been abrading for several hours, and I’m really pleased that’s behind me now.
However, it’s nog finished yet. I’m going to do somethings special with 1 plate, but I’m not 100% sure what it’s going to be
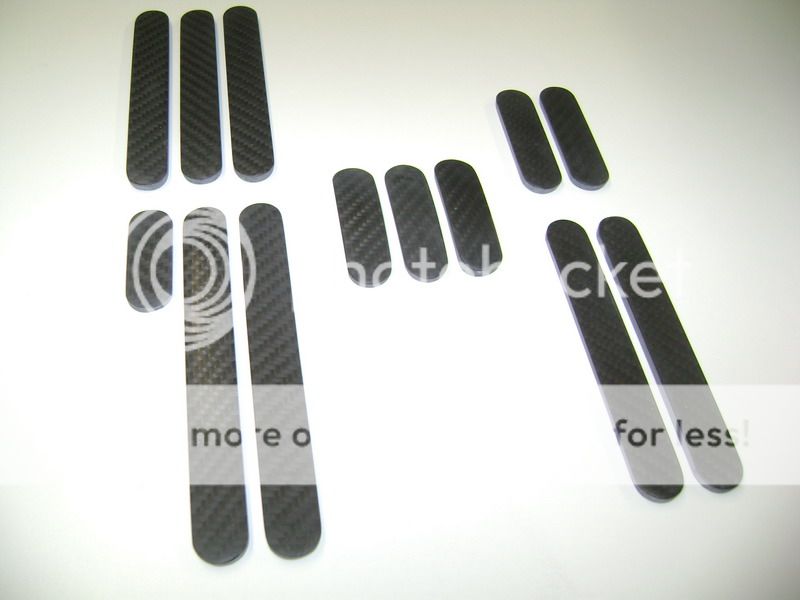
Once the varnish is on here, only then the carbon fibre will appear.
About the emblems, I’m working on my own logo to add to that.
However, it’s nog finished yet. I’m going to do somethings special with 1 plate, but I’m not 100% sure what it’s going to be
Once the varnish is on here, only then the carbon fibre will appear.
About the emblems, I’m working on my own logo to add to that.
Oct 31, 2011 | 02:55 PM
#27
Thread Starter
| Teamspeed Member
Joined: Jan 2008
Posts: 179
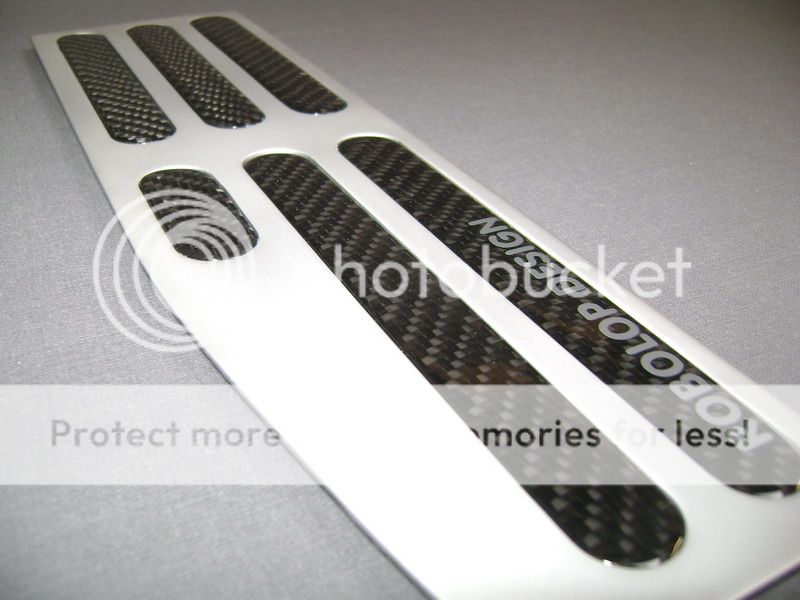
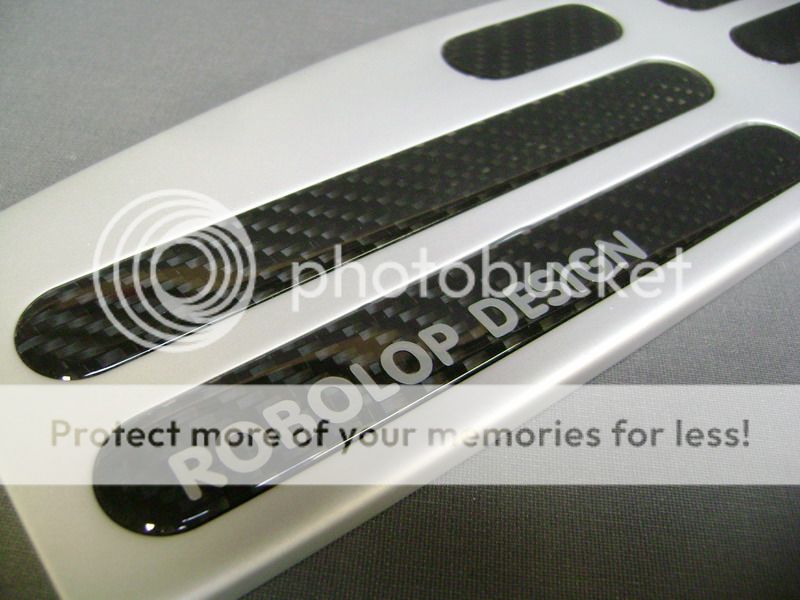
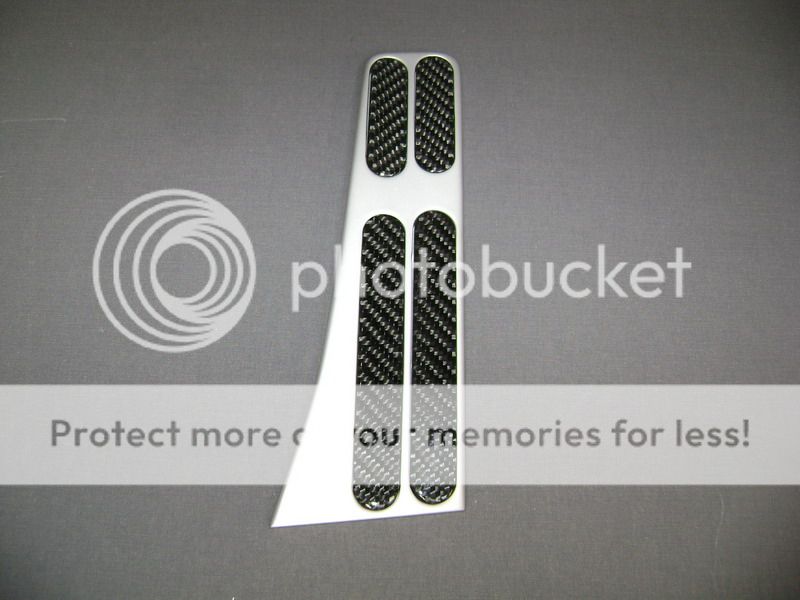
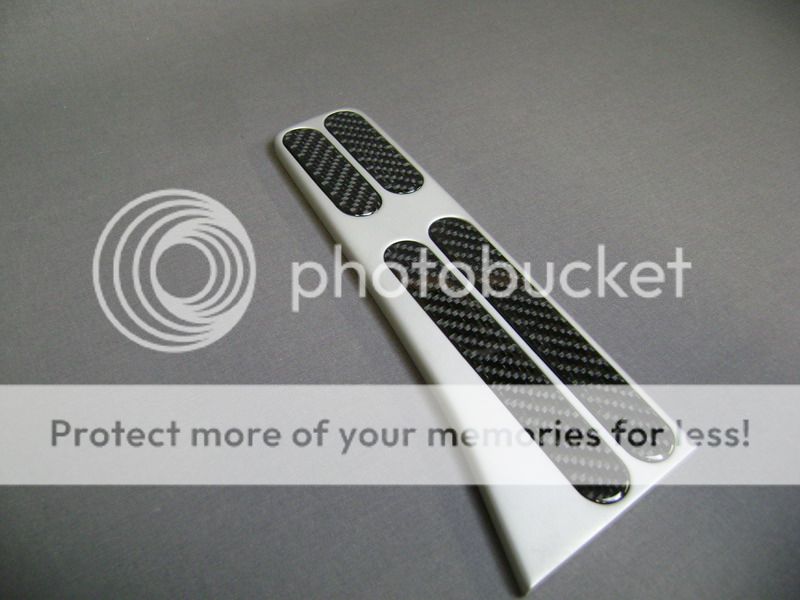
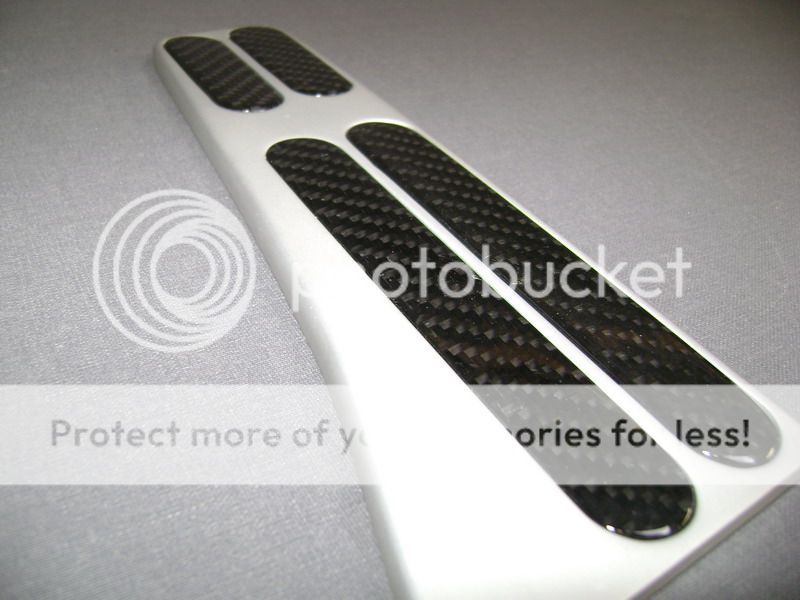
As you can see, the pedals are ready to get mounted in the car.
I was pretty scared about the anodization, since that’s something I didn’t do myself. But they have done it just the way I wanted.
The silver colour is the same as the other interiorpieces of the car.
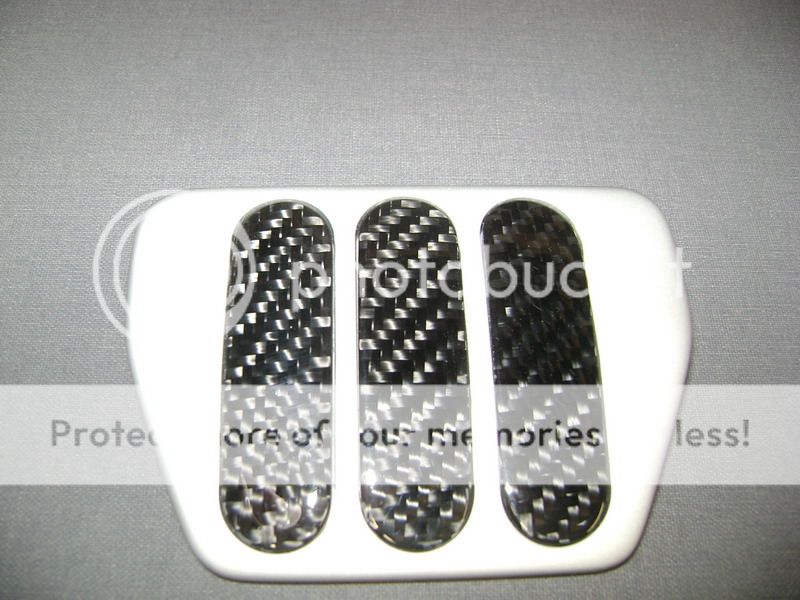
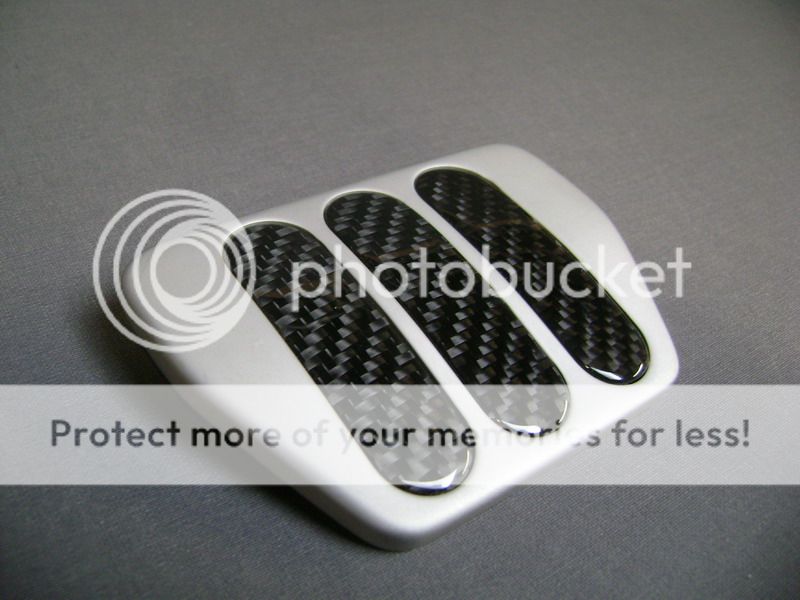
Here the foot-support.
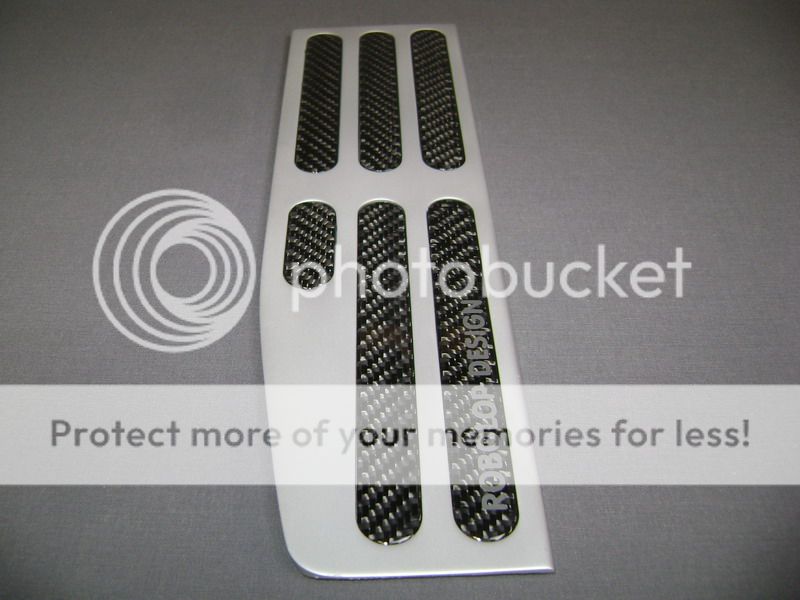
The little sticker-letters that I let someone make for me.
These are silver, and are underneath the varnish, so nothing can harm them there
The brake.
As you look closely on the bottomside of the carbon fibre, you’ll see there’s a lot of varnisch on there.
This varnisch is scratch-free, and is as solid as a rock. Time will tell�
The gas pedal.
And finally, the complete set.
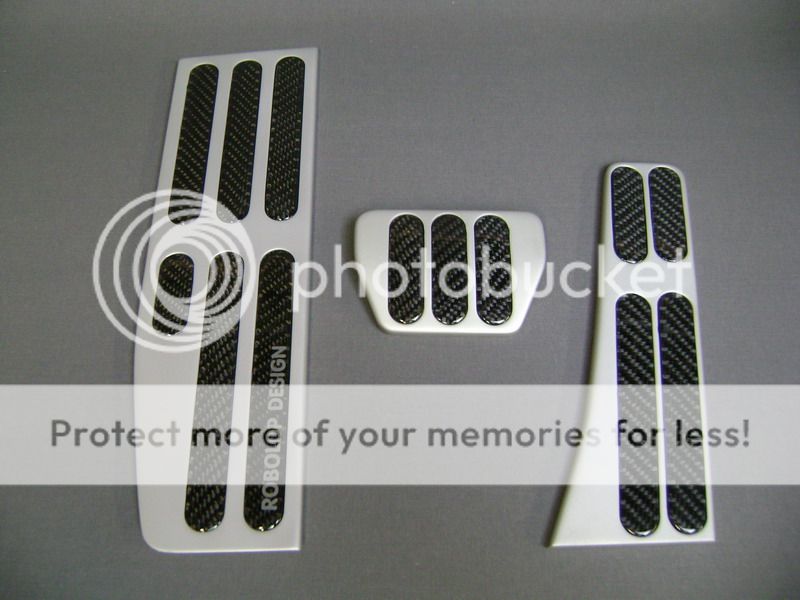
These set of pedals, I think, will need a yearly maintenance�
I mean that in time, I’ll have to take em off, screw the carbon plates loose, abrade them again, add another layer of varnish, and put it all together.
No pain no gain, they say;;;
now, when it’s finished, I realize I again finished something small that took a lot of work
My carbon fibre stock is empty for the moment, but next week 10m� will be delivered� so up to the next!
I was pretty scared about the anodization, since that’s something I didn’t do myself. But they have done it just the way I wanted.
The silver colour is the same as the other interiorpieces of the car.
Here the foot-support.
The little sticker-letters that I let someone make for me.
These are silver, and are underneath the varnish, so nothing can harm them there
The brake.
As you look closely on the bottomside of the carbon fibre, you’ll see there’s a lot of varnisch on there.
This varnisch is scratch-free, and is as solid as a rock. Time will tell�
The gas pedal.
And finally, the complete set.
These set of pedals, I think, will need a yearly maintenance�
I mean that in time, I’ll have to take em off, screw the carbon plates loose, abrade them again, add another layer of varnish, and put it all together.
No pain no gain, they say;;;
now, when it’s finished, I realize I again finished something small that took a lot of work
My carbon fibre stock is empty for the moment, but next week 10m� will be delivered� so up to the next!
Oct 31, 2011 | 02:56 PM
#28
Thread Starter
| Teamspeed Member
Joined: Jan 2008
Posts: 179
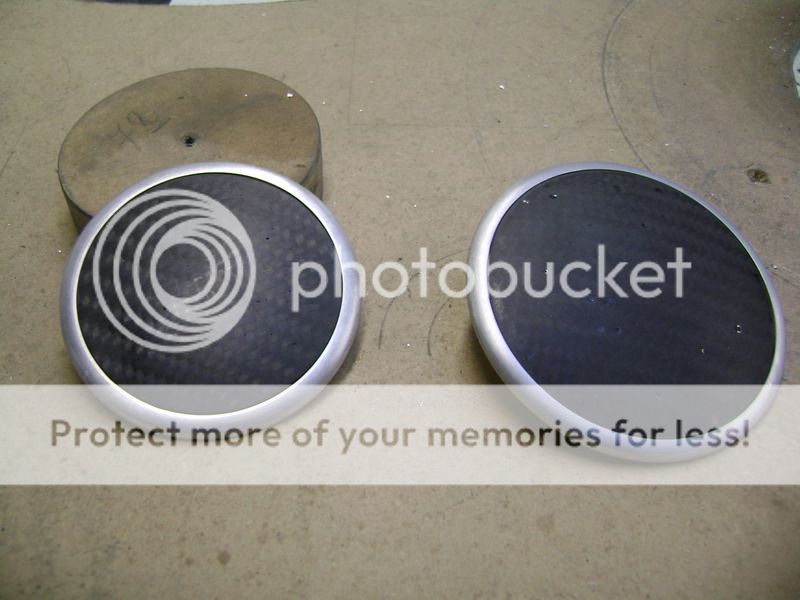
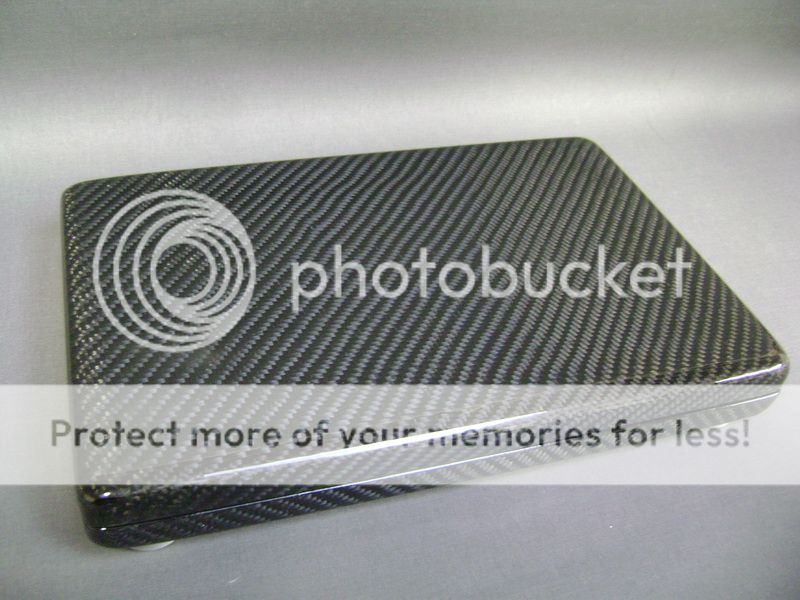
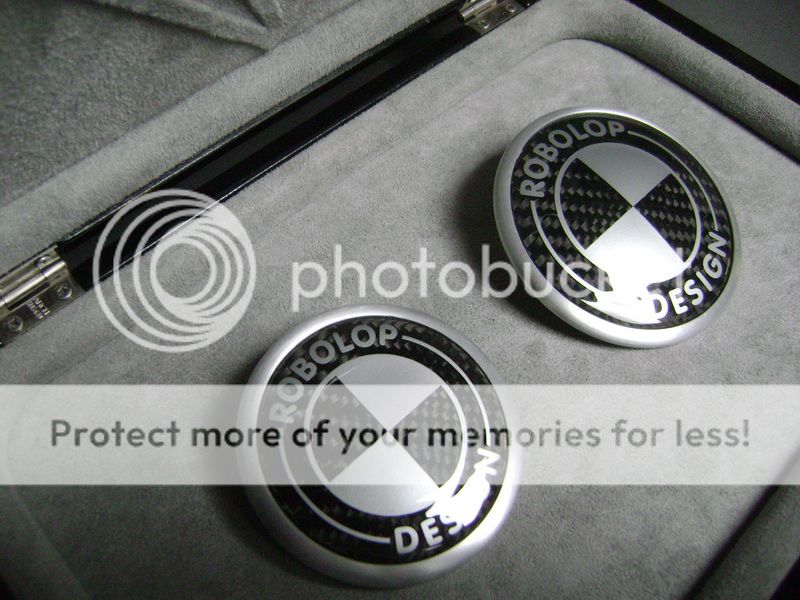
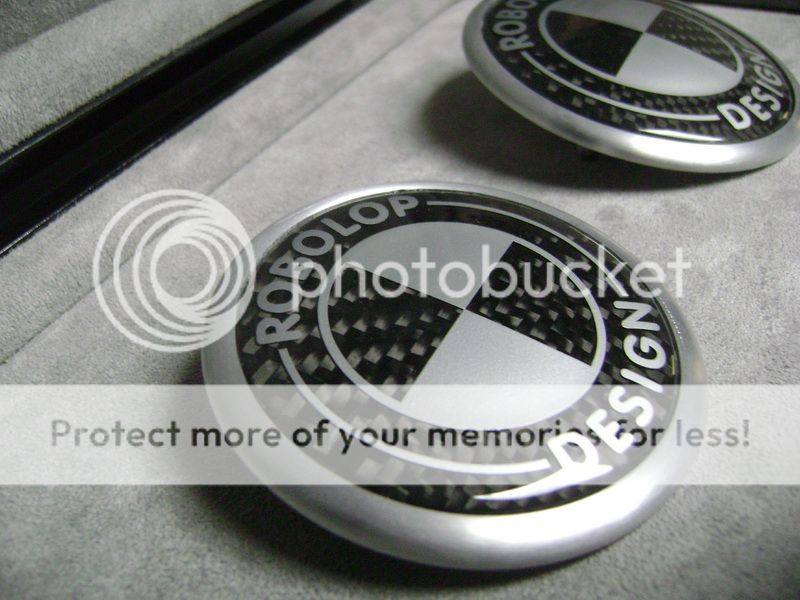
Meanwhile, I totally finished the CF logo’s. Here the show pictures.
What’s in the CF box?
Robolop’s Logo �.O yeah�.
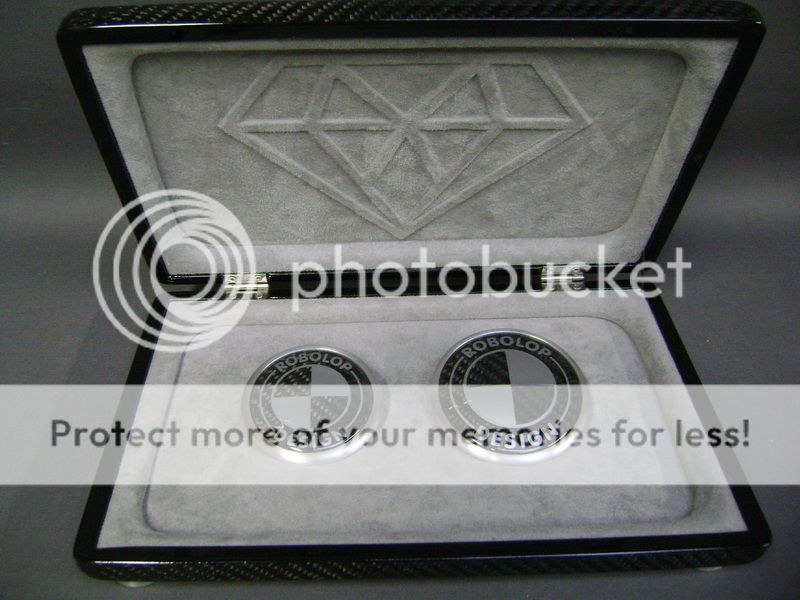

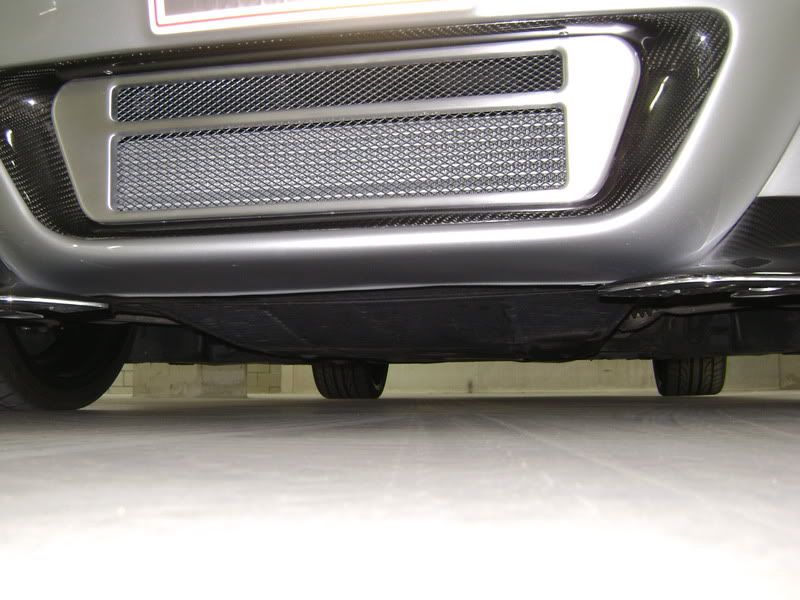
The aluminum ring, I abraded in the same way I did like the alu in the front bumper.
I had the intention of painting them black, like the window moldings�But then again, there would be no more contrast with the carbon fibre.
Silver, like the car, wasn’t an option either.
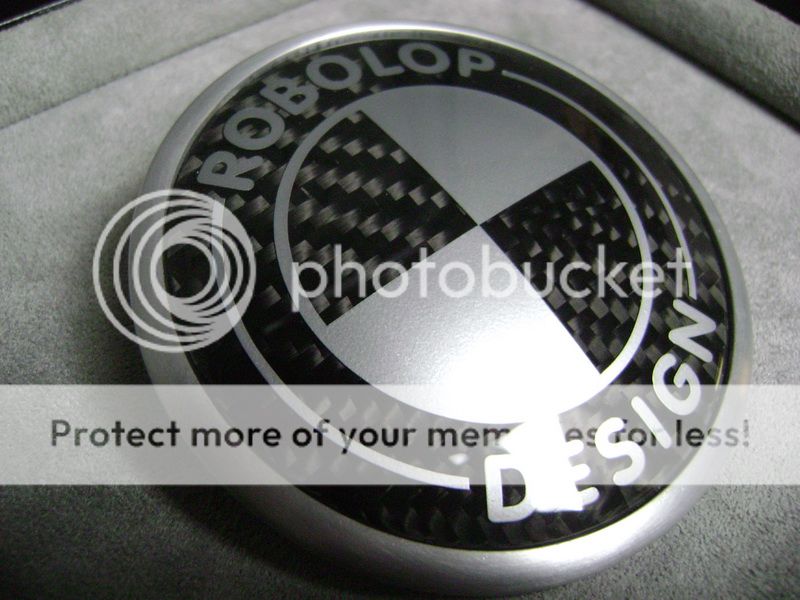
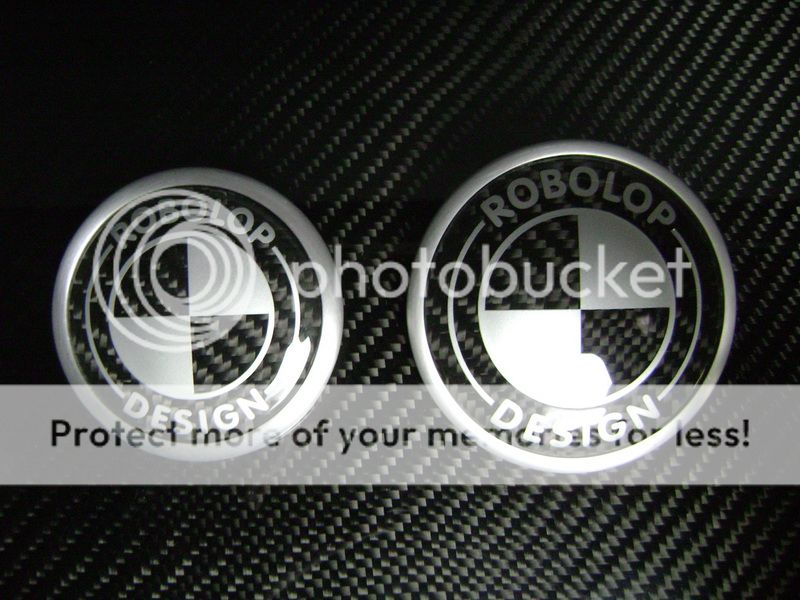
For me, they worked out a 100%, and again, I’ve got something original.
What’s in the CF box?
Robolop’s Logo �.O yeah�.
The aluminum ring, I abraded in the same way I did like the alu in the front bumper.
I had the intention of painting them black, like the window moldings�But then again, there would be no more contrast with the carbon fibre.
Silver, like the car, wasn’t an option either.
For me, they worked out a 100%, and again, I’ve got something original.

