
ROBOLOP BERYLLIUM BMW 323ci
 Oct 28, 2011 | 03:26 PM
#1

Thread Starter
| Teamspeed Member
Joined: Jan 2008
Posts: 179


ROBOLOP BERYLLIUM BMW 323ci
A little word of me...
I was always interesting in car audio. It Is my biggest hobby , every time i got i spend it on the car. 12 year ago I had a fiat 500. I worked 3 years one the car for restoration it and building a stereo in it..I did some competition wit it and from the 19 games i did I when 17 first ..My second contest was at the European final in PARIS en i was second after THOMAS (swipe) WESTMAN from Sweden.The next year I was in BIRMINGHAM ( IASCA FINAL). I was first in my class and the first place BEST OF INSTAL.Then i make a decision to stop white contest.I was one my highest level .
In the years I was competing i was always working on the car for making it better and better. Evey minute I got I spend on the car..there was always the pressure of performing better . When I began on this project i make the decision , to make something beautiful en having fun and now pressure. I NOT going to compete whit this car...Not whit the speakers on the A pillar, and not with the plexy sub box.
Writing this is not so simple for me. I understand, and speak English but that's everything. I can't write English i am translating my words with the help off a translation program. It's not so simple for me to tell everything in detail. But i hope you will understand. I really hope to get some comments good or bad. Everybody had his opinion about car stereo.
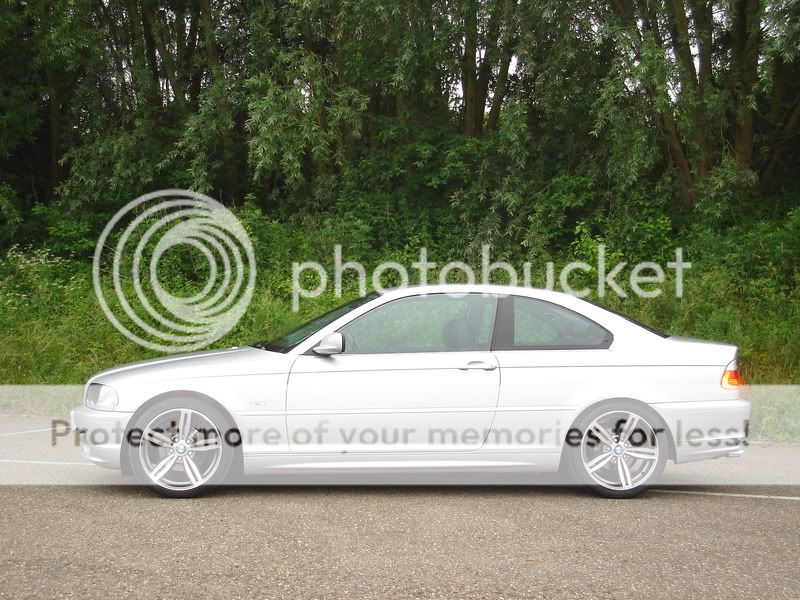
This is the car


I was always interesting in car audio. It Is my biggest hobby , every time i got i spend it on the car. 12 year ago I had a fiat 500. I worked 3 years one the car for restoration it and building a stereo in it..I did some competition wit it and from the 19 games i did I when 17 first ..My second contest was at the European final in PARIS en i was second after THOMAS (swipe) WESTMAN from Sweden.The next year I was in BIRMINGHAM ( IASCA FINAL). I was first in my class and the first place BEST OF INSTAL.Then i make a decision to stop white contest.I was one my highest level .
In the years I was competing i was always working on the car for making it better and better. Evey minute I got I spend on the car..there was always the pressure of performing better . When I began on this project i make the decision , to make something beautiful en having fun and now pressure. I NOT going to compete whit this car...Not whit the speakers on the A pillar, and not with the plexy sub box.
Writing this is not so simple for me. I understand, and speak English but that's everything. I can't write English i am translating my words with the help off a translation program. It's not so simple for me to tell everything in detail. But i hope you will understand. I really hope to get some comments good or bad. Everybody had his opinion about car stereo.
This is the car
Oct 29, 2011 | 12:56 PM
#3
Thread Starter
| Teamspeed Member
Joined: Jan 2008
Posts: 179
After surfing all through the net, finally I found the frontbumper I liked, and decided to go for a CSL model.
There will be likers and hater, but I likes it, that's the main thing...
Like everyone already knows, the bumper is only for the E46 M3, since this is a coup�, it'll has to be a "CSL look-a-like model".
To be sure that the bumper, at delivery, will fitt 100%, I emailed all across the globe...
Finally I decided to order the bumper (company name not added here)
I order a plastic, pvc bumper and not a polyester one.. He will be made of the same material as the original bmw bumpers..
The fitment would be 100%... so why wait... ORDER !!!
After 2 weeks of waiting, the bumper was delivered at home.
After unwrapping, I inmediately saw that the bumper was polyester
Cause the 2 carbon splitters at the bottom were only a surpluss of 100***8364;, so I had ordered those as well..
well, they were not in the package
Phoned the company and they said they had a fire, and those splitters will be delivered later on...
When I said that the bumper was made out of fiberglass, and not of the plastic I asked...they asured me it was plastic.
left it there, and put the phone down.
Looked at that thing for a couple minutes, and it turned out to be a real nightmare.
You can see what material it's made of... djee, could that be fiberglass?.


let's do the test


the holes.


There will be likers and hater, but I likes it, that's the main thing...
Like everyone already knows, the bumper is only for the E46 M3, since this is a coup�, it'll has to be a "CSL look-a-like model".
To be sure that the bumper, at delivery, will fitt 100%, I emailed all across the globe...
Finally I decided to order the bumper (company name not added here)
I order a plastic, pvc bumper and not a polyester one.. He will be made of the same material as the original bmw bumpers..
The fitment would be 100%... so why wait... ORDER !!!
After 2 weeks of waiting, the bumper was delivered at home.
After unwrapping, I inmediately saw that the bumper was polyester
Cause the 2 carbon splitters at the bottom were only a surpluss of 100***8364;, so I had ordered those as well..
well, they were not in the package
Phoned the company and they said they had a fire, and those splitters will be delivered later on...
When I said that the bumper was made out of fiberglass, and not of the plastic I asked...they asured me it was plastic.
left it there, and put the phone down.
Looked at that thing for a couple minutes, and it turned out to be a real nightmare.
You can see what material it's made of... djee, could that be fiberglass?.
let's do the test
the holes.


 Oct 29, 2011 | 12:57 PM
#5
Thread Starter
| Teamspeed Member
Joined: Jan 2008
Posts: 179
fitted that piece of sh* on the car
How it fitted, well, you guess can guess. I was rollin' on my belly from laughing
When I tightened it with the screws, it was only 2cm sticking forward.
Already pulled the inside fenders to make it longer, but that didn't work that well lol
Then you have 2 options:
1) trow that thing in the bin or go back to the manufacturer
2) leave it at that, and look again the next day
I chose the last option.
Cause it was a fiberglass bumper, it could be my luck, cause that's something I familiar with
So, the next day, took my favorite tool of all: "THE DISC"
those screws I put 2cm more to the front, so the bumper nicely touched the fenders.

Don't be mistaken, this took a few hours to get it that good.


Here you see the slots where the plated is hooked with 2 descent screws.

Once this was done, I tightened it all together with fiberglass.

As you can see, I also cleaned out the tow hook didn"t match at all...
How it fitted, well, you guess can guess. I was rollin' on my belly from laughing
When I tightened it with the screws, it was only 2cm sticking forward.
Already pulled the inside fenders to make it longer, but that didn't work that well lol
Then you have 2 options:
1) trow that thing in the bin or go back to the manufacturer
2) leave it at that, and look again the next day
I chose the last option.
Cause it was a fiberglass bumper, it could be my luck, cause that's something I familiar with
So, the next day, took my favorite tool of all: "THE DISC"
those screws I put 2cm more to the front, so the bumper nicely touched the fenders.
Don't be mistaken, this took a few hours to get it that good.
Here you see the slots where the plated is hooked with 2 descent screws.
Once this was done, I tightened it all together with fiberglass.
As you can see, I also cleaned out the tow hook didn"t match at all...
Oct 29, 2011 | 12:58 PM
#6
Thread Starter
| Teamspeed Member
Joined: Jan 2008
Posts: 179
This is how it sits on the car, and matches the fenders pretty nice.


Next thing to do is to flatten the top of the bumper, cause now you can surf on the waves...
First making a little plate of 3mm thick against the hood and the 2 pieces the come under the lights.
So we will have 3mm of difference everywhere at the top
And when this is done, I get it back off and flatten it with the sanding block.
Oct 29, 2011 | 12:59 PM
#7
Thread Starter
| Teamspeed Member
Joined: Jan 2008
Posts: 179
The next day... with some metallica on the background, but the sanding block with a grain 80 and rubbed some bumper.
First thing that came to light is that there's a big layer of gelcoat on there, witch is good in this case.
After a couple of hours with the block, most of the unevennesses are already gone, and it all looked so much better.
Then I started with connecting it all nicely on the car.
this was easy. Sawed 3 little MDF-plates of 4mm thick.
2 for L & R under the headlights, and one for under the hood.
Just taped it on with doublelayer tape


Cause the hood has a bit of a rounding, I disced the plate a little, so it goes nice with the flow.

After that, mounted the bumper, and put some filler on there.


Now, I have to maintain this height, and work towards the front of the bumper. EASY
O yeah, I also reinforced some pieces at the back of that thing, much better if you have to rubb it all.
Also did a phonecall to the people who delivered me this piece of crap.
Friendly asked to put my money for those carbon splitters back on my account, I'll make those myself...Then we're sure it'll fit..
About all the rest, better to shut up before I get the rest of my euro's back on my account. Then it's time for some puppetshow
First thing that came to light is that there's a big layer of gelcoat on there, witch is good in this case.
After a couple of hours with the block, most of the unevennesses are already gone, and it all looked so much better.
Then I started with connecting it all nicely on the car.
this was easy. Sawed 3 little MDF-plates of 4mm thick.
2 for L & R under the headlights, and one for under the hood.
Just taped it on with doublelayer tape
Cause the hood has a bit of a rounding, I disced the plate a little, so it goes nice with the flow.
After that, mounted the bumper, and put some filler on there.
Now, I have to maintain this height, and work towards the front of the bumper. EASY
O yeah, I also reinforced some pieces at the back of that thing, much better if you have to rubb it all.
Also did a phonecall to the people who delivered me this piece of crap.
Friendly asked to put my money for those carbon splitters back on my account, I'll make those myself...Then we're sure it'll fit..
About all the rest, better to shut up before I get the rest of my euro's back on my account. Then it's time for some puppetshow
Oct 29, 2011 | 01:00 PM
#8
Thread Starter
| Teamspeed Member
Joined: Jan 2008
Posts: 179
The connection on the top of the bumper is OK, this fits now how I wanted it.
Then I started to make a notch on top of the bumper, where the hood falls into.
That something you have to put some extra time in, to make this perfect.
So, mounted back the bumper, and where that notch has to come, we taped it all with tape.
Mesured it all correctly and penciled it on the car. After that, pulled the tape and cut it out.
Now this is my model.

made another plate MDF of 4mm thick

Taped this on the bumper with doublesided tape.


Once this was done, I put some filler towards it.

Rubbed it all down till it fitted to the plate nicely.

Pulled the plate from it, and this was the result.


then it was childsplay to connect the sideds perfectly.

Then I started to make a notch on top of the bumper, where the hood falls into.
That something you have to put some extra time in, to make this perfect.
So, mounted back the bumper, and where that notch has to come, we taped it all with tape.
Mesured it all correctly and penciled it on the car. After that, pulled the tape and cut it out.
Now this is my model.
made another plate MDF of 4mm thick
Taped this on the bumper with doublesided tape.
Once this was done, I put some filler towards it.
Rubbed it all down till it fitted to the plate nicely.
Pulled the plate from it, and this was the result.
then it was childsplay to connect the sideds perfectly.
Oct 29, 2011 | 01:01 PM
#9
Thread Starter
| Teamspeed Member
Joined: Jan 2008
Posts: 179
Cause on the inside, I now had a right upside,I rounded this like it is done on the original bumper
For this, I used white filler instead of black one, so I could see much better if it was all straight in line with everything.


Then I also discovered.......the bottom of the bumper was also tilt and crom. aaaaaarg
Anyway, to make this perfect, you have to have a 100% straight table (wich hI had.
Put the bumper on there, and drew it over.
After that, taped the table.
Now you can see how miserable it looked.


Also put a pile of filler on the side, and put the bumper nicely on the table.


Here you can see the result of the trick of the table

A perfectly STRAIGHT bumper
life can be beautiful
For this, I used white filler instead of black one, so I could see much better if it was all straight in line with everything.
Then I also discovered.......the bottom of the bumper was also tilt and crom. aaaaaarg
Anyway, to make this perfect, you have to have a 100% straight table (wich hI had.
Put the bumper on there, and drew it over.
After that, taped the table.
Now you can see how miserable it looked.
Also put a pile of filler on the side, and put the bumper nicely on the table.
Here you can see the result of the trick of the table
A perfectly STRAIGHT bumper
life can be beautiful
Oct 29, 2011 | 01:01 PM
#10
Thread Starter
| Teamspeed Member
Joined: Jan 2008
Posts: 179
Everything that should have fitted when it was delivered, ... finally fits now !


here the connections with hood and headlights...


Have to rubb it down twice or so, one with 240 wet, and then with a 360
ready for primer after that.
here the connections with hood and headlights...
Have to rubb it down twice or so, one with 240 wet, and then with a 360
ready for primer after that.